Getting Started
In this chapter we give an overview of MAESTROeX, including some of the standard problems, how to run the code, some basic runtime parameters, and how to look at the output.
Requirements
MAESTROeX requires a C++ compiler that supports the C++17 standard and
a C compiler that supports the C99 standard. Several compiler suites
are supported, including GNU, Intel, LLVM and Cray. GNU Make (>= 3.82)
is also required, as is Python (>= 3.9) and standard tools available
in any Unix-like environments (e.g., Perl and sed).
For running in parallel, an MPI library and/or OpenMP is required. For running on GPUs, CUDA 11 or later is required (see GPU for more information).
Quick Start
Here we will run the standard reacting_bubble problem (three reacting bubbles in a plane-parallel stratified atmosphere) on a single processor [1]. This test problem was shown in paper 3.
Get a copy of MAESTROeX.
If you don’t already have a copy of MAESTROeX, you can obtain one from the project’s github page: https://github.com/AMReX-Astro/MAESTROeX . There are several options: you can fork it directly on github (recommended if you intend to develop the code) or clone it using git from the project page by typing:
git clone https://github.com/AMReX-Astro/MAESTROeX.git
MAESTROeX is under active development, so you will want to keep in sync with the changes by periodically pulling from the repository. Simply type:
git pull
in the
MAESTROeX/directory.Get a copy of Microphysics.
MAESTROeX and its compressible counterpart CASTRO share a common-set of microphysics solvers (nuclear reaction networks and equations of state). These are kept in a separate repo. There are two ways to access the Microphysics repo: you can use a submodule or clone the Microphysics repo itself.
If you choose to use the submodule, enter the
MAESTROeX/directory and type:git submodule init
Note that in the future when you pull MAESTROeX, to make sure the Microphysics submodule is also updated you must instead use:
git pull --recurse-submodules
Alternatively, you can run the following command on your system to ensure that updating the submodules upon a git pull is the default behavior:
git config --global submodule.recurse true
If you choose to use the Microphysics repo directly, it is available on github and can be obtained via:
git clone https://github.com/AMReX-Astro/Microphysics.git
Next you must specify the path to the Microphysics repository as a global environment variable on your machine,
MICROPHYSICS_HOMEYou will periodic want to update Microphysics by doing:
git pull
in the
Microphysics/directory.Get a copy of AMReX.
MAESTROeX requires the AMReX library to manage the grids and parallelization. We also rely on the build system in AMReX to build a MAESTROeX executable. AMReX is also available on github and can be obtained via:
git clone https://github.com/AMReX-Codes/amrex.git
You will periodic want to update AMReX by doing:
git pull
in the
amrex/directory.Setup your shell environment.
MAESTROeX needs to know where to find AMReX, by specifying the
AMREX_HOMEenvironment variable, and where to find Microphysics, by specifying theMICROPHYSICS_HOMEenvironment variable.If your shell is Bash, add:
export AMREX_HOME="/path/to/amrex/"
export MICROPHYSICS_HOME="/path/to/Microphysics/"
to your
.bashrc.If your shell is Csh/Tcsh, add:
setenv AMREX_HOME /path/to/amrex/
setenv MICROPHYSICS_HOME /path/to/Microphysics/
to your
.cshrc.Note: you must specify the full path to the
amrex/andMicrophysics/directory. Do not use “\(\sim\)” to refer to your home directory—the scripts used by the build system will not be able to process this.Setup the problem’s GNUmakefile.
In MAESTROeX, each problem lives under one of three sub-directories of
MAESTROeX/Exec/:SCIENCE/,TEST_PROBLEMS/, orUNIT_TESTS/. This problem sub-directory will contain any problem-specific files as well as theGNUmakefilethat specifies how to build the executable. Note: we rely on features of GNU make. Full details of theGNUmakefilecan be found in § Adding A New Problem. Here we will configure for a serial build.Change directory to
MAESTROeX/Exec/TEST_PROBLEMS/reacting_bubble/. We only need to worry about the options at the very top of the GNUmakefile for now. These should be set as follows:DEBUG := TRUEThis option determines whether we compile with support for less-optimized code with debugging runtime checks. Setting
DEBUG := FALSEturns off debugging.DIM := 2The dimensionality of the problem must be specified at compile-time.
COMP := gnuThis option specifies the gnu compiler suite (e.g., g++). We will use gnu, which is the preferred compiler suite for MAESTROeX. Specifying this compiler will automatically pull in the compiler settings as specified in
AMREX_HOME/Tools/GNUMake/Make.defs. (Alternate compiler choices includeintel,cray, andpgi.USE_MPI := TRUEThis determines whether we are doing a parallel build, using the Message Passing Interface (MPI) library. If you set this option to FALSE, you will disable MPI and will build MAESTROeX in serial mode, so no MPI library needs to be present on the host system.
USE_OMP := FALSEThis determines whether we are using OpenMP to do parallelism within a shared memory node. OpenMP is used together with MPI, with MPI distributing the grids across the processors and within a shared-memory node, OpenMP allows many cores to operate on the same grid. For now, we leave this option as FALSE, disabling OpenMP.
USE_REACT := TRUESome test problems in MAESTROeX do not use reactions, so there is an option to disable the compilation of reaction-specific source code.
TINY_PROFILE := FALSEProfiling tool that generates a text file with profiling information. Refer to the AMReX User’s Guide at https://amrex-codes.github.io/amrex/
PROFILE := FALSEMore advanced profiling tool that generates a text file with profiling information, or data files that can be interpreted with a special build of amrvis. Selecting TRUE overrides the
TINY_PROFILE setting. Refer to the AMReX User’s Guide at https://amrex-codes.github.io/amrex/
Build the executable.
Type
make. The build system will first find the dependencies amongst all the source files and then build the executable. When finished, the executable will have a name likeMaestro2d.gnu.DEBUG.MPI.ex, where the specific parts of the name depend on the options used inGNUmakefile.Note, at the end of the build process, a link will be made in the current directory to the data table needed for the equation of state (
Microphysics/EOS/helmholtz/helm_table.dat).Run!
Each problem requires an input file. The inputs file consists of lines of the form parameter = value, where parameter is one of the many runtime parameters MAESTROeX knows, and value overrides the default value for that parameter. For the
reacting_bubbleproblem, we will use the inputs fileinputs_2d_C. An overview of some of the more common runtime parameters is given in § 5, and a full list of all MAESTROeX runtime parameters and their default values is given in Chapter Runtime Parameters.MAESTROeX is run simply as:
./Maestro2d.gnu.DEBUG.MPI.ex inputs_2d_C
or to run in parallel on a local workstation:
mpiexec -n 4 ./Maestro2d.gnu.DEBUG.MPI.ex inputs_2d_C
We can also override the default value of any runtime parameter by specifying it on the commandline as, e.g.,:
./Maestro2d.gnu.DEBUG.MPI.ex inputs_2d_C maestro.max_step=0 amr.n_cell=192 320
As the code runs, a lot of information will pass through the screen. For each timestep, each of the steps 1 through 12 shown in the MAESTROeX flowchart (Chapter Governing Equations) will be shown along with diagnostic information about the solution. Upon completion some memory usage information is printed.
Examine the output.
As the code runs, it will output both plotfiles and checkpoints as well as one or more text diagnostic files (this is currently only implemented for spherical problems) with integral or extrema information (like maximum Mach number) from each timestep.
By default, the plotfiles will be named pltnnnnnnn, where the number nnnnnnn is the timestep number when the file was outputted. Similarly, the checkpoints are named chknnnnnnn. AMReX plotfiles and checkpoints are actually directories, with the data stored in sub-directories grouped by refinement level. Details of the simulation (build information, number of processors used, output date, output directory, runtime parameter values, …) are stored in the plaintext
job_infofile in each plotfile and checkpoint directory.Note
unless otherwise specified all quantities in MAESTROeX are assumed to be in CGS units.
Visualization of results is described in the next section.
Working with the Output
Visualization and analysis are done on the plotfiles. A number of
in-house and externally developed tools can work with AMReX-formatted
plotfiles [2].
An example plot of the reacting_bubble problem run above is
shown in the figure below:
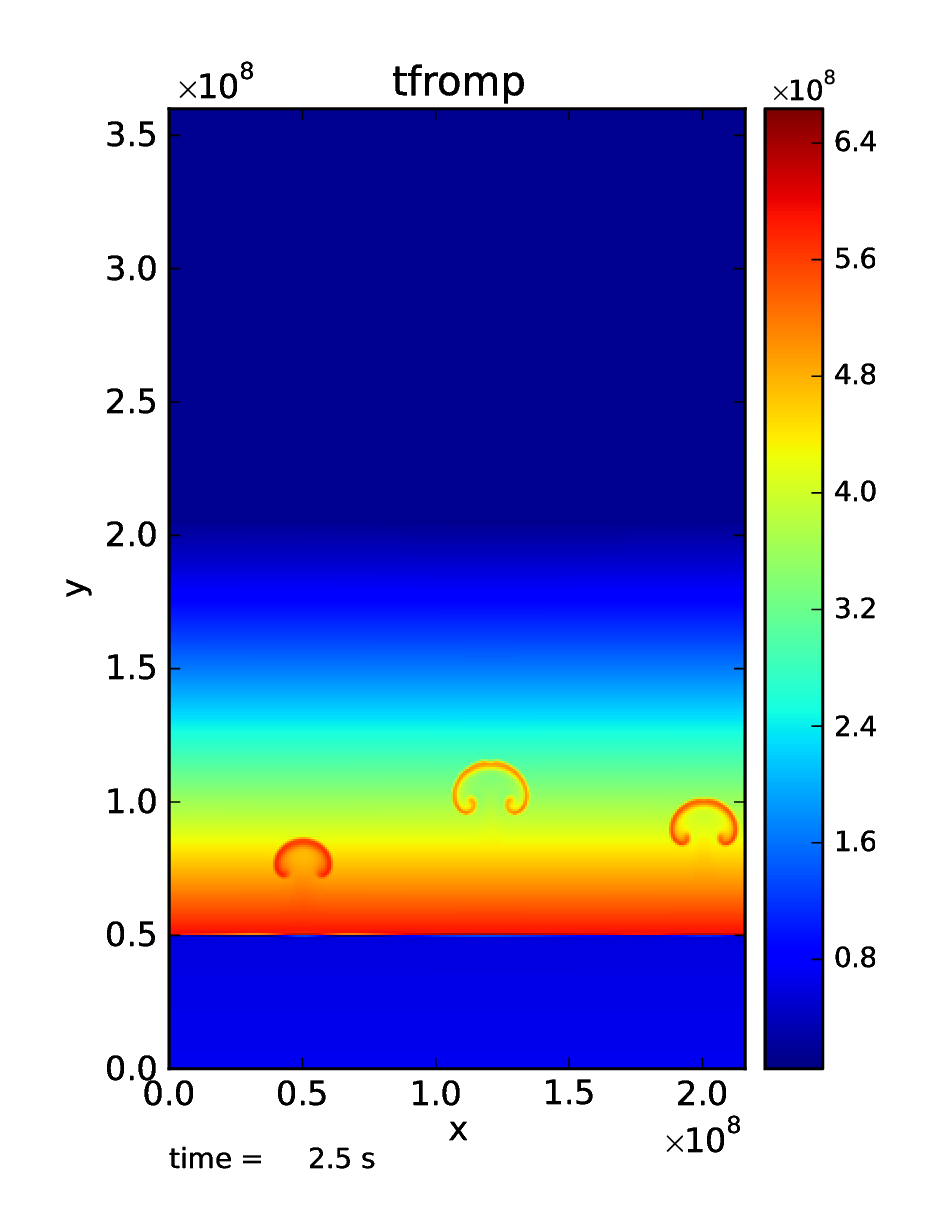
Fig. 3 Visualization of the final output of the reacting_bubble problem showing the temperature field (as derived from the pressure). This plot was done with the AmrPostprocessing tools.
Amrvis
Amrvis is an easy-to-use visualization tool developed at LBL for 2- and 3D datasets which can plot slices through 3D datasets as well as volume-renderings. It can also very easily extract 1D lines through the dataset along any coordinate direction. It is distributed separately from the MAESTROeX distribution.
Amrvis can be obtained via git from github as:
git clone https://github.com/AMReX-Codes/Amrvis.git
Also, to build a 3D version of Amrvis you need to obtain volpack using:
git clone https://ccse.lbl.gov/pub/Downloads/volpack.git
Amrvis uses the Motif library for defining the GUI. On a Linux system, you may need to install the lesstif package and any related development packages (e.g. lesstif-devel). Depending on your Linux system, you may also need to install libXpm and related development packages (e.g. libXpm-devel).
AmrPostprocessing scripts
Several useful analysis scripts can be found
in the amrex-astro-diag project:
VisIt
VisIt is a DOE-supported visualization tool for 2- and 3D datasets. It can do contouring, volume rendering, streamlines, … , directly from AMReX plotfiles. Details on VisIt can be found at: https://wci.llnl.gov/codes/visit/home.html . The easiest way to get started with VisIt is to download a precompiled binary from the VisIt webpage.
Once VisIt is installed, you can open a AMReX plotfile by pointing VisIt to the Header file in the plotfile directory.
yt
yt (version 3.0 and later) can natively read the MAESTROeX plotfiles. See the yt documentation or § Visualizing with yt.
Diagnostic Files
By default, MAESTROeX outputs global diagnostics each timestep into 3
files called diag_vel.out, diag_temp.out, and diag_enuc.out
for spherical problems (ex. wdconvect).
These include various properties such as the maximum Mach number,
peak temperature, and peak nuclear energy generation rate, respectively.
Individual problems can provide their own diag.F90 file to
produce custom diagnostic output. This information can be plotted
directly with GNUplot, for example.
Development Model
When you clone MAESTROeX from github, you will be on the main branch of the repo. New changes to MAESTROeX are first introduced into the development branch in the MAESTROeX git repository. Nightly regression tests are run on development to ensure that our answers don’t change. Around the first work day of each month, we merge from development \(\rightarrow\) main (assuming tests pass) and tag the state of the code with a date-based tag YY-MM. We do this on all the other repos in the AMReX-ecosystem, including amrex/, Microphysics/, and Castro/.
If you want to contribute to MAESTROeX’s development, issue a pull-request through GitHub from your fork of MAESTROeX and target the development branch. (If you mistakenly target main, we can change it for you.)
Parallel Jobs
To run in parallel with MPI, you would set USE_MPI := TRUE in your
GNUmakefile. For a machine with working MPI compiler wrappers
(mpif90 and mpicc), the build system should find these and
compile with MPI support automatically. This is the easiest way to do
a parallel build, and should work on most Linux systems.
More generally, the build system needs to know about your MPI installation. For popular national computing facilities, this is already setup, and the build system looks at the machine hostname to set the proper libraries. For other machines, you may need to edit the GMake.MPI file in the AMReX build files. See § MAESTROeX Build System for more details.
OpenMP can be used to parallelize on shared-memory machines (i.e. within a node). OpenMP support is accomplished through the compiler. Setting:
USE_OMP = TRUE
in the GNUmakefile will enable the proper compiler flags to build
with OpenMP. Note: not all MAESTROeX modules have OpenMP support.